
Polycarbonate Architectural
A self-fastening system, based on Multiwall panels, SPANCO polycarbonate glazing panels are available in a range of thicknesses.
Advantages
- Can withstand extremely high loads
- Allows for expansion & contraction
- Quick and easy installation
- Leakproof
- Superior thermal insulation
- Ideal for curved designs
- Dual sided UV protection
- Cool light colors
Application
- Skylight and window applications
- Commercial and retail roofing solutions
- Roofing of sport facilities
- Capped walkways, awnings & entrances
- Light roofing for open markets
- Service stations - translucent roofing
- Parking structure covers
Panel Types
SPANCO® panels are of multi-wall structure, available by thicknesses of 8mm, 10mm, 18mm and 20mm. Standard SPANCO® panels have UV protection on both sides (specific order can be produced with UV protection on one side only). Maximum panel length is 11.80 (typical stock length).
| Type | Panel Data | Drawing |
|---|---|---|
|
SPANCO®
8/600 Lite |
Width: 600mm Height: 23.5mm Height with PC-Joiner: 33mm Weight: 1.11 Kg/m, 1.83 Kg/m² Min. cold bending radius: 2.0m |
|
|
SPANCO®
8/600 |
Width: 600mm Height: 23.5mm Height with PC-Joiner: 33mm Weight: 1.24 Kg/m, 2.00 Kg/m² Min. cold bending radius: 2.0m |
|
|
SPANCO®
10/600 |
Width: 600mm Height: 25.5mm Height with PC-Joiner: 35mm Weight: 1.56 Kg/m, 2.60 Kg/m² Min. cold bending radius: 2.4m |
|
|
SPANCO®
18/1000 |
Width: 1000mm Height: 33.5mm Height with PC-Joiner: 41mm Weight: 3.11 Kg/m, 3.11 Kg/m² Min. cold bending radius: 3.0m |
|
|
SPANCO®
20/1000 |
Width: 1000mm Height: 35.5mm Height with PC-Joiner: 43mm Weight: 3.19 Kg/m, 3.19 Kg/m² Min. cold bending radius: 3.0m |
|


SPANCO® Polycarbonate sheets are great alternative materials for architectural roofing, glazing and industrial applications.
Typical Physical Properties
| Property | Method* | Conditions | Units | Value |
|---|---|---|---|---|
|
Density |
D-792 |
|
g/cm³ |
1.2 |
|
Heat Deflection Temperature (HDT) |
D-648 |
Load: 1.82 MP |
°C |
130 |
|
Service Temperature – Short term |
|
|
°C |
-50 to +120 |
|
Service Temperature – Long term |
|
|
°C |
-50 to +100 |
|
Coefficient of linear thermal expansion |
D-696 |
|
cm/cm °C |
6.5 x 10⁻⁵ |
|
Tensile strength at yield |
D-638 |
10 mm/min |
MPa |
62 |
|
Elongation at break |
D-638 |
10 mm/min |
% |
>80 |
|
Impact falling dart |
ISO 6603/1 |
|
J |
40-400 |
|
Practical Thermal expansion/contraction rate |
|
|
mm/m |
3 |
|
Coefficient of linear thermal expansion |
D-696 |
|
cm/cm ˚C |
6.5 x 10 5 |
Flammability
SPANCO® flammability classification appears in the attached table, based on a test performed by certified independent laboratories. The quoted certificate represents the flammability performance of the entire system.
- Method : EN 13501
- Classification : B, s1, d0
*Depends on panel thickness.
Thermal Insulation
| Type |
U-Value [Watts /m²·°C] |
R-Value [m²·°C / Watt] |
|---|---|---|
|
SPANCO® Lite 8 mm |
2.45 |
0.41 |
|
SPANCO® 8 mm |
2.45 |
0.41 |
|
SPANCO® 10 mm |
2.10 |
0.47 |
|
SPANCO® 18/20 mm |
1.50 |
0.67 |
Assembly Details
| Sr. No. | Legend |
|---|---|
|
01 |
Panel |
|
02 |
PC Joiner |
|
03 |
End-Cap for PC Joiner |
|
04 |
Aluminum Joiner ‘C’ |
|
05 |
End-Cap for Alu Joiner ‘C’ |
|
06 |
Aluminum Sealing Strip |
|
07 |
Polycarbonate U-Profile |
|
08 |
T-Fastener |
|
09 |
T-Stopper |
|
10 |
Aluminum Span-Bar |
|
11 |
Aluminum F-Profile |
|
12 |
Metal Screw |
|
13 |
Wood Screw |
|
14 |
Aluminum U-Profile |


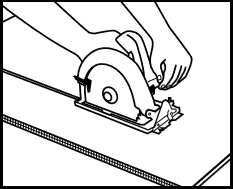
Cut panels to length allowing for an overhang of no more than 100mm at each end. A penetration of minimum 50mm into the gutter is recommended. Use a circular or hand saw with fine tooth blades for easier and more precise cutting.
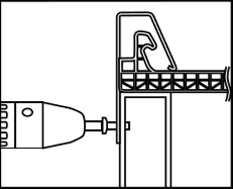
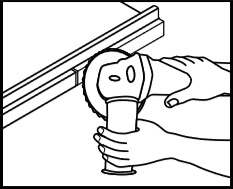
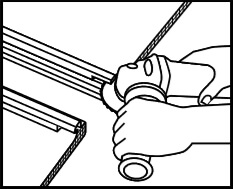
Using a small cutting disc (2mm thick), prepare 18mm deep horizontal cuts at each end of the panel teeth. This cut should be parallel to the panel top face, but without damaging the panel surface. Since this step needs precision, it is highly recommended to perform this action at ground floor level.
Use a vacuum cleaner or an air compressor with a blow gun to blow out any “swarf” or loose particles from inside the panel. Make sure that both ends of the panel are not covered with the protective film.
To achieve a symmetric installation, determine the layout of the first panel, starting at the center of the structure. Measure the structure’s width, to determine using odd or even number of the prepared panels. Accordingly, mark on the support purlins the location of the middle panel or middle pair of panels. For “side to side” installation, set up the first panel, fitted to the side flashing at the preferred starting side.
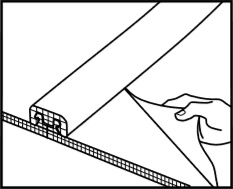
Remove the protective film from the internal face only. Keep this side away from the roof purlins until final positioning of the panel, to avoid scratching.
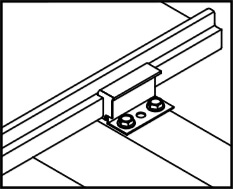
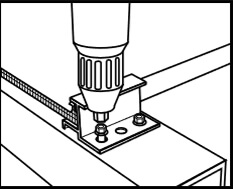
The T-stopper’s main function is to create a fix point (zero movement) for each panel. This will allow to control the direction of thermal expansion and contraction, and prevent the panels from shifting due of gravity. Fix the T-Stopper using hex head fixings provided while considering the following recommendations:
- Curved application: The T-stopper will be normally fixed at the peak.
- Roof end with no gutter: The T-stopper shall be fixed at the last purl-in in order to eliminate differential movements (esthetics).
- Roof end with gutter: The T-stopper should fix at the opposite of the expansion allowance.
- Wall Application: The T-Stopper should be fastened at the end of the panel where thermal expansion cannot be accommodated. In this method all thermal expansion is directed to the opposite end of the panel. Proper spacing must be calculated.
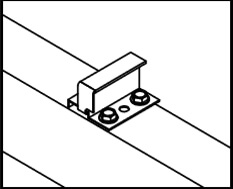
Along the panel on remaining purl-ins (see span table for rafter design), place T-fasteners against the panel and fix them into place using hex head fixings provided (2 fixings for standard, 3 fixings for high wind areas and hurricane regions).
Remove protective film from the underside of the second panel and place against T fasteners.
Using a rubber mallet, start to fix the Joiner, locking the 2 panels together by striking with short intervals (5-10cm) along the joiner. Start at the bottom end, and work your way up the roof (ensure that the joiner overhangs the panel ends by 13mm, where the aluminum sealing strip will be installed later).
Shortly after installation, peel off the protective film from the panel’s external face. Delaying removal of the protective film can make it very difficult or impossible to peel off later on. On exceptionally hot days, remove the top protective film immediately to prevent it from bonding with the panel.
until all panels are in place, except for the external panels.
Using a circular saw (fitted with fine tooth blades) or jigsaw, cut the external side panels to width.
The aluminum F section should be firmly affixed against the last rafter or end of purlins (note: if fixing to metal purlins, make sure the ends of the purlins are closed off).
to the rafter or end of purl-in using teak screws.
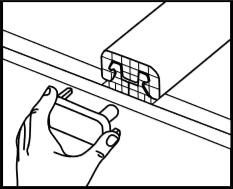
At the panel top end by pushing on. It is designed to be a tight fit, so start by pushing one end on and slowly tap it until it is firmly inserted. PC U-Profile (for SPANCO® 8mm and 10mm) is to tap by hand, for Al U-Profile (SPANCO® 18mm) and 20mm) use a rubber mallet.
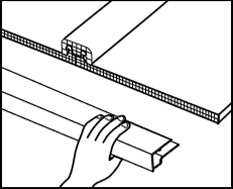
At the panel bottom end by pushing it on. It is designed to be a tight fit, so start by pushing one end on and using a mallet slowly tap it until it is firmly inserted. These sealing strips are necessary to prevent penetration of dirt and moisture.
Insert Joiner End-cap in both Joiner ends. The End-cap for PC Joiner is pushed into place. The End-cap for Aluminum Joiner is fit with screws. There is no need to use silicone sealants or adhesives of any kind.
These are used on both sides of the structure as fasteners as well as flashings. They are fit either for full width or cut-to-size panels. Application-specific flashings are required in some situations. End-caps should fit to these flashings on both ends.
- SPANCO® system does not require using silicons or adhesives for parts interface. For sealing of flashing assemblies use only approved accessories, silicons, sealing tape, closure fixtures etc.
- For cleaning SPANCO® multi panels use a pressure cleaner and allow natural drying. Do not use cloth/ sponge/ chamois or similar, doing this can scratch the panels and harm their performance.
Frequently Ask Question (FAQ)
Polycarbonate glazing sheet is a type of plastic sheet that is commonly used for roofing, skylights, and wall cladding. It is made of polycarbonate, a strong and durable material that provides excellent transparency and light transmission.
Some of the advantages of using polycarbonate glazing sheets include:
- Can withstand extremely high loads
- Allows for expansion & contraction
- Dual sided UV protection
- Energy efficient
- Superior thermal insulation
- Ideal for curved designs
- Quick and easy installation
Yes, polycarbonate glazing sheet is fire resistant and meets various fire safety standards.
The available sizes and thicknesses of polycarbonate glazing sheets thicknesses vary from 8mm, 10mm, 18mm and 20mm.
Yes, polycarbonate glazing sheets can be cut into desired size.
The lifespan of polycarbonate glazing sheet can vary depending on the manufacturer, but it is generally expected to last for at least 10-15 years with proper care and maintenance.
The warranty offered on polycarbonate glazing sheet manufacturers by Spanco is 10 years warranty on their products. It is important to check with the manufacturer for specific warranty information.
Polycarbonate glazing sheets are widely used in various applications in India such as Skylight and window applications, Commercial and retail roofing solutions, Roofing of sport facilities, Capped walkways, awnings & entrances, Light roofing for open markets, Service stations – translucent roofing
Parking structure covers, and more.
The fixing accessories required to install panels depend on various factors such as the type of panel, application, and installation method. Common accessories include screws, brackets, profiles, gaskets, and sealants. It’s important to choose the right accessories to ensure the panels are securely installed and function properly.
Yes, it is possible to connect glazing polycarbonate sheets with metal corrugated sheets using appropriate accessories such as profiles and sealing components. This can provide a durable and weather-resistant solution for roofing, skylights, and other applications. It’s important to follow the manufacturer’s guidelines for proper installation.
QUALITY
Guarantee that we offer
SPANCO® Durable Roofing Solutions determines to accomplish and maintain a prestige for superiority and shall aspire to fulfill the customer requirement by higher grade products / high quality standards at competitive prices and delivery within the scheduled time-span.
- Enhancing clientele gratification
- Encouragement and advancement of an employee
- Vision of Ceaseless prosperity & to lead globally
- Comprehensive forethought activities to assure completion within time-span
- Knowledge sharing cardinal to innovation
